
Jump to Recipe Print Recipe
These citrusy Lemon Meringue Pie Bars are the perfect portable dessert! With a buttery shortbread base, tangy lemon center, and pillowy marshmallow topping, they’re easier to serve than traditional pie but just as delicious!
WHY BARS ARE BETTER THAN ROUND PIES (SOMETIMES!)
Let’s be honest – traditional round pies are gorgeous, but they’re not always practical. There’s the whole struggle of getting that first slice out intact, dealing with serving at parties, and trying not to demolish the entire thing when no one’s looking.
Enter these Lemon Meringue Pie Bars – all the amazing flavors of classic lemon meringue pie but in a convenient, hand-held form! I can cut them into perfect squares, pack them for gatherings, or (let’s be real) hide them from my family more easily. It’s like pie, but more… sensible? Who am I kidding – I made them, photographed them, and then proceeded to stand over the pan eating “just one more tiny piece” until a concerning amount disappeared!
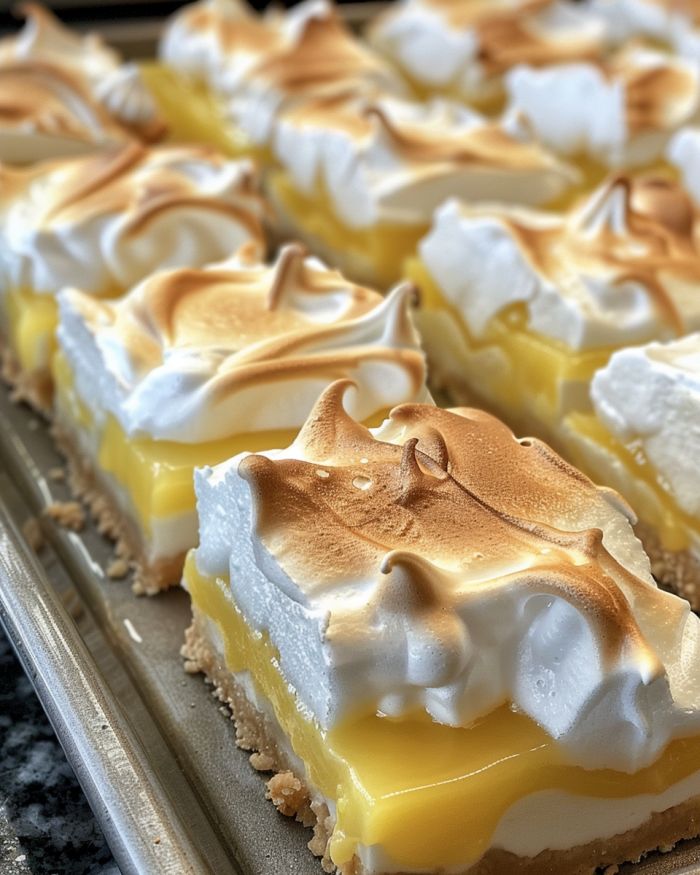
What makes these bars truly special is the marshmallow meringue topping. I’ve never been a huge fan of traditional meringue – it’s got that slightly eggy taste that just doesn’t do it for me. But this marshmallow version? Game changer! It’s glossy, stable, and tastes like a toasted marshmallow cloud. Once you try it, there’s absolutely no going back to regular meringue.
YOUR BURNING QUESTIONS ANSWERED:
What makes marshmallow meringue different from regular meringue?
Traditional meringue is made by whipping egg whites and sugar, then baking it. Marshmallow meringue takes an extra step – heating the egg whites and sugar together first before whipping. This process (technically called Swiss meringue) creates a more stable structure and eliminates that “eggy” flavor. The result is a silky, marshmallow-like topping that holds its shape beautifully and tastes like a dream.
My meringue never gets stiff peaks. What am I doing wrong?
Three likely culprits: First, check for any speck of egg yolk in your whites – even a tiny amount prevents proper whipping. Second, make sure your mixing bowl is completely clean and grease-free. Finally, be patient! It takes a good 5-7 minutes of beating at high speed to reach stiff peaks. Keep going until the meringue stands up straight when you lift the beater.
Can I make these with regular lemons or do I need Meyer lemons?
Regular lemons work perfectly! While Meyer lemons have a lovely flavor, they’re more seasonal and sometimes hard to find. Standard lemons give these bars that classic bright tang that contrasts beautifully with the sweet meringue. The key is using fresh lemons – their juice and zest have vibrant flavors that bottled juice just can’t match.
How do I avoid a soggy crust?
The secret is baking the shortbread base just right before adding the filling. Those 14 minutes of initial baking create a slight barrier that helps prevent sogginess. Another tip: make sure your lemon layer is fully set before refrigerating – that way moisture won’t seep into the crust during chilling.
I don’t have a kitchen torch. Is there another option?
Absolutely! Your oven’s broiler works too. Place the finished bars on a baking sheet, position them about 6 inches from the broiler element, and watch them like a hawk – literally do not look away even for a second. They’ll brown in about 1-2 minutes. Rotate the pan if needed for even browning.
THE ESSENTIAL INGREDIENTS:
For the Shortbread Crust:
shortbread cookies – these buttery delights create a rich foundation that complements the tangy lemon beautifully. Their already high butter content means you need to add very little additional butter to form a cohesive crust.
butter – just enough to bind those cookie crumbs together into a solid base. Melted butter distributes more evenly throughout the crumbs than softened butter, creating a more uniform texture.
For the Lemon Layer:
fresh lemon juice – the star of the show! Fresh juice has bright, complex notes that the bottled stuff just can’t replicate. I recommend juicing your lemons at room temperature and rolling them firmly on the counter first to extract maximum juice.
lemon zest – don’t skip this! The oils in the zest contain concentrated lemon flavor that adds incredible depth. Just be careful to only zest the yellow part, as the white pith underneath is bitter.
granulated sugar – balances the tartness of the lemon and helps create that perfect custard-like consistency. The ratio of sugar to lemon juice is crucial – too little and it’s face-puckeringly sour, too much and you lose that essential tangy character.
eggs – these magical ingredients provide structure, richness, and help create that signature smooth, creamy texture. They also act as thickeners as they cook, transforming the liquid filling into a sliceable consistency.
For the Marshmallow Meringue:
egg whites – the foundation of our cloud-like topping. Room temperature whites whip up better than cold ones, so plan ahead if possible.
sugar – not just for sweetness! Sugar stabilizes the egg whites, allowing them to hold air and maintain their structure. When heated together, they create that distinctive marshmallowy texture.
HOW TO CREATE THESE DELECTABLE BARS
Let’s start with preparation! Preheat your oven to 350°F and line a 9-inch square baking pan with foil, leaving some overhang on the sides for easy removal later. This foil sling is non-negotiable unless you want to be digging bars out of the pan! Give the foil a light coating of cooking spray to prevent sticking.
For the crust, transform those shortbread cookies into fine crumbs. A food processor makes quick work of this, but you can also seal them in a zip-top bag and crush them with a rolling pin (great for releasing any pent-up frustrations!). Mix the crumbs with melted butter until they resemble damp sand.
Press this mixture firmly into your prepared pan, creating an even layer. I find using a flat-bottomed measuring cup helps create a smooth, compact crust. Pop it in the oven for 14 minutes – this creates a partially baked base that can support the lemon filling without becoming soggy.
While the crust bakes, prepare the lemon filling. In a medium bowl, whisk together the sugar, salt, and lemon zest first – this helps release the aromatic oils from the zest, infusing the sugar with intense lemon flavor. Then add the lemon juice and eggs, whisking until well combined.
When the crust comes out of the oven, give the lemon mixture one final whisk (the sugar tends to settle), then pour it carefully over the hot crust. Return the pan to the oven and bake for about 20 minutes. You’ll know it’s done when the edges start to brown slightly and the center is set but still has a slight jiggle – like Jell-O, not like a wave.
Allow the bars to cool completely at room temperature before covering and refrigerating until thoroughly chilled. This patience-testing step is crucial – it allows the filling to set properly for clean slices. Rushing this results in a messy (though still delicious) situation!
NEXT PAGE
ADVERTISEMENT

